AI Presets
Create, manage, and organize reusable AI presets for image generation and chat in Media Moana
AI Presets (/ai-presets/image-presets) let you create reusable prompt templates for image generation and chat. Each preset stores a title, description, model selection, prompt content, and model-specific parameters — so you can generate images or start chat sessions with a single click instead of configuring everything from scratch.
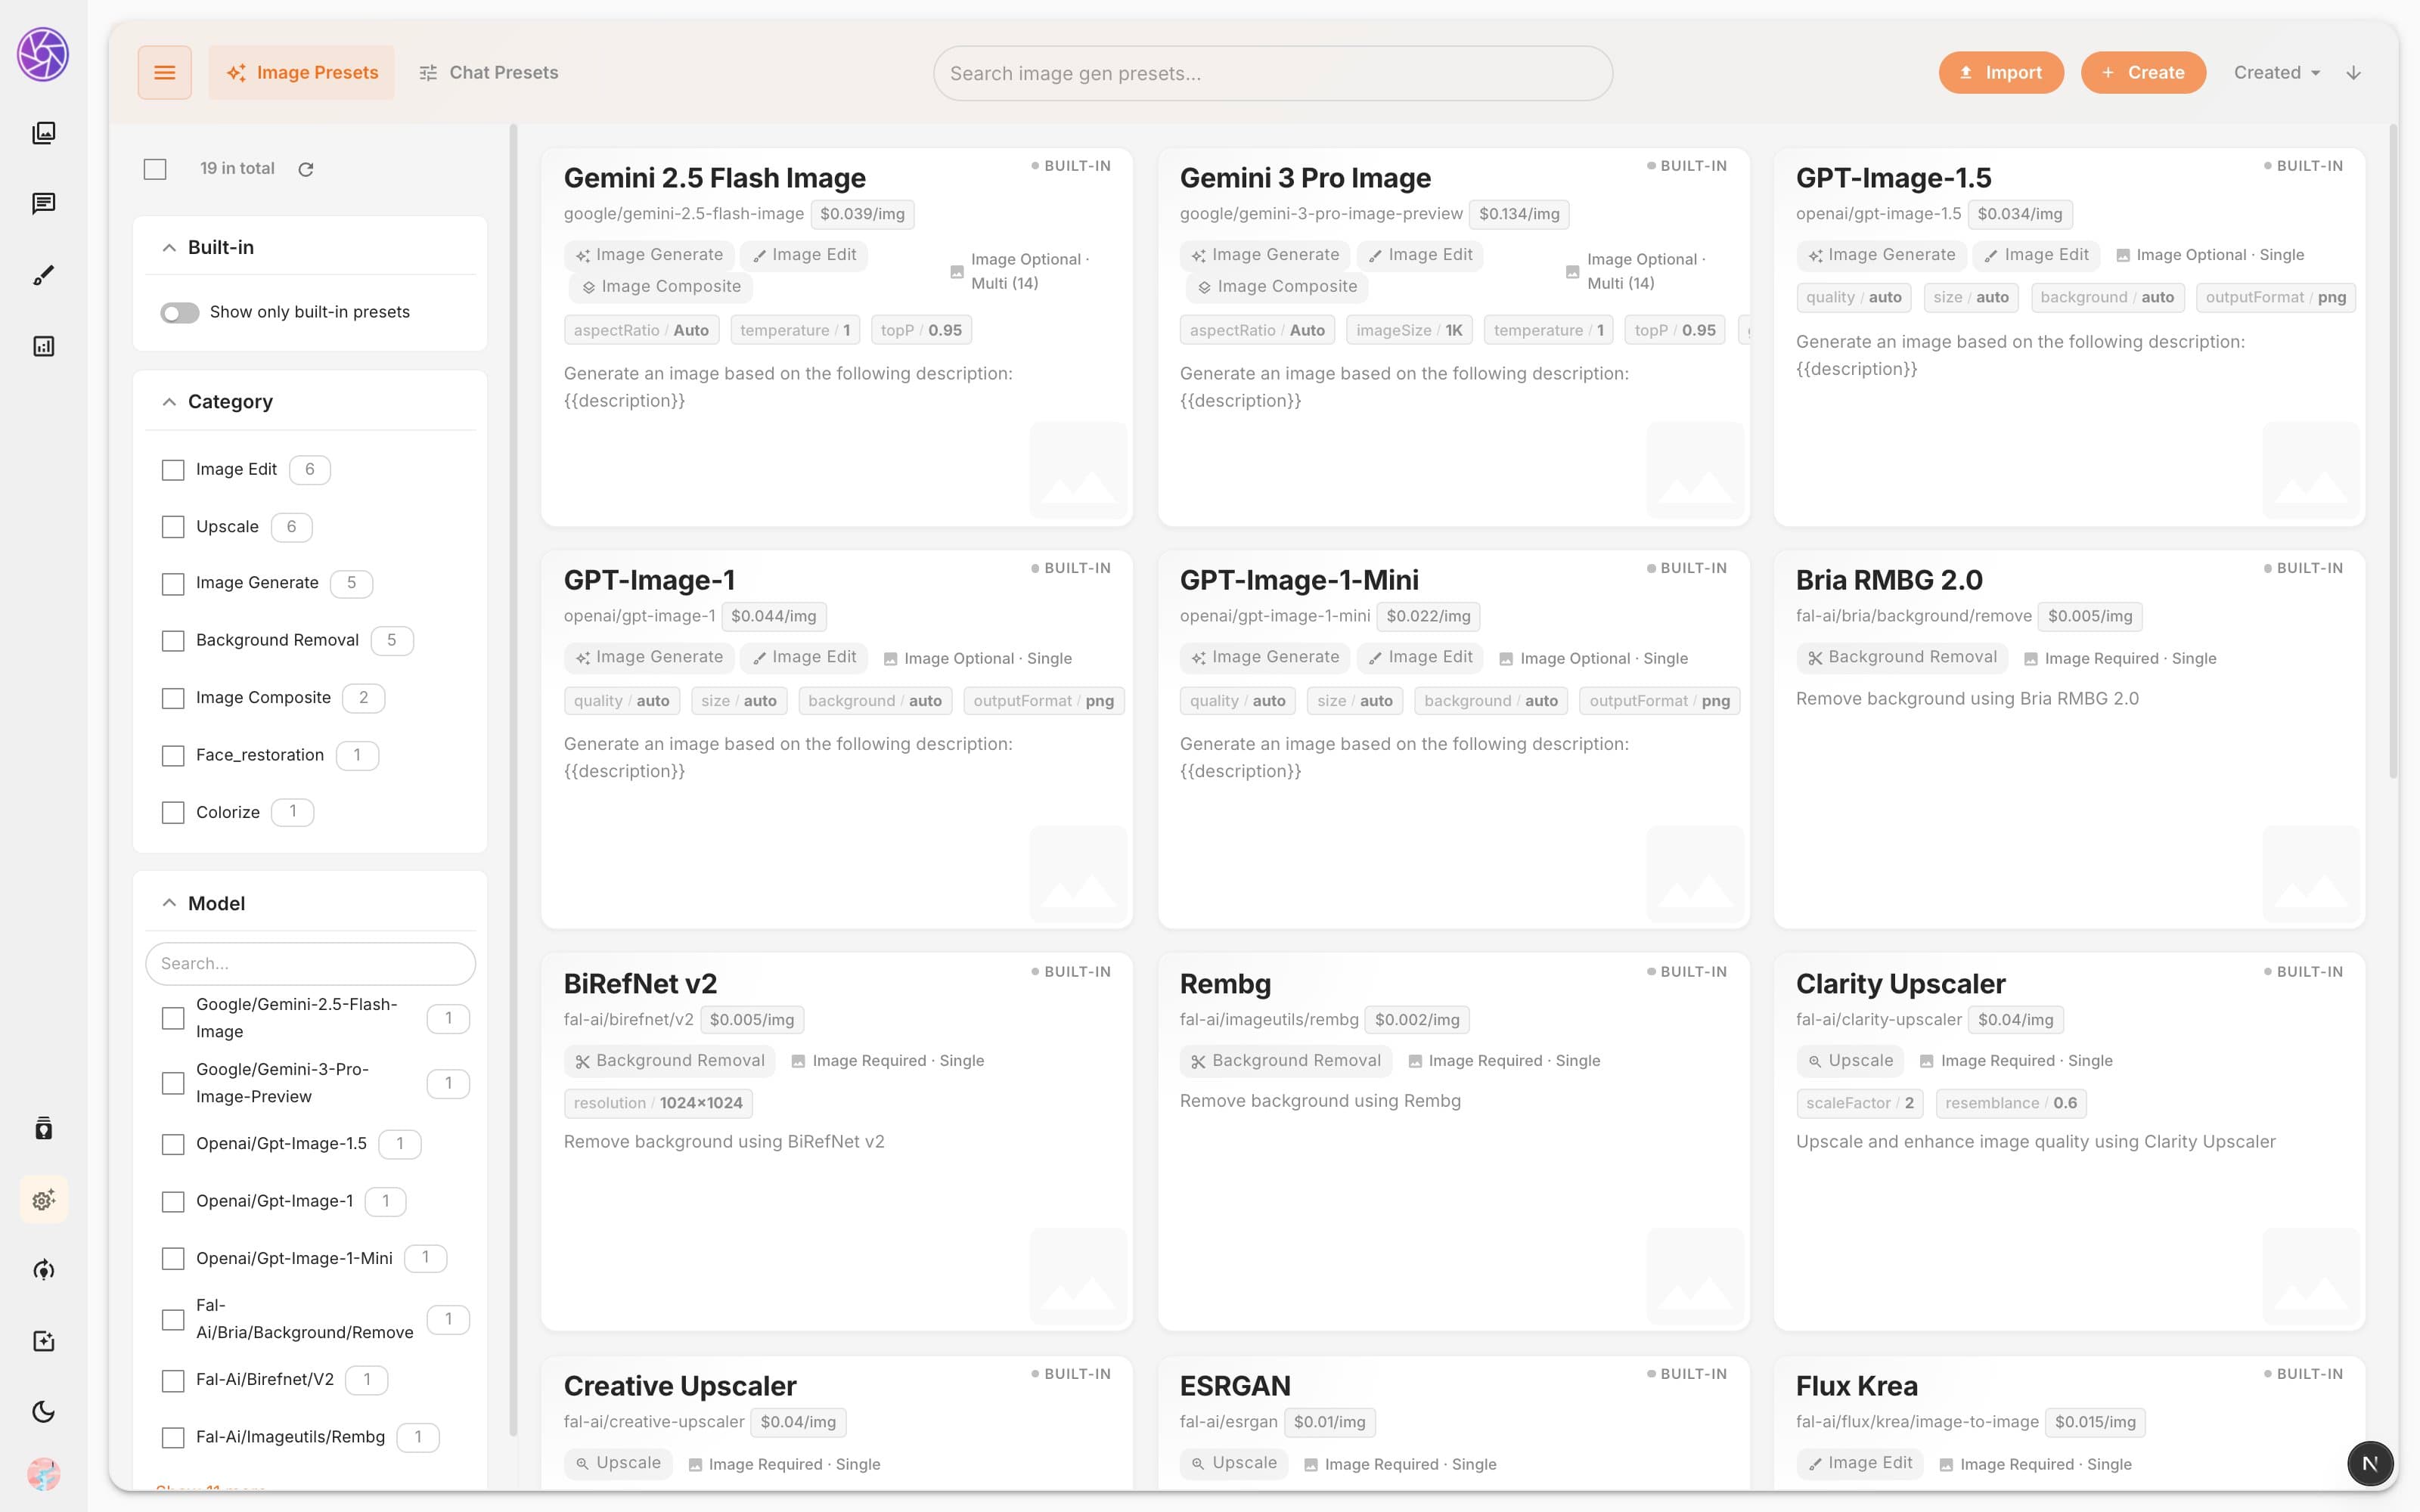
Two preset types
The page is divided into two tabs:
| Tab | What it does |
|---|---|
| Image Presets | Presets for AI image generation models. Includes model parameters (quality, size, style) and optional prompt. |
| Chat Presets | Presets for chat/text models. Includes a prompt template and optional JSON Schema for structured output. |
Switch between tabs using the tab bar at the top of the page.
Page layout
The AI Presets page is organized into three areas:
- Top bar — tab switcher, search box, sort options, and action buttons (Import, Create).
- Left sidebar — filters to narrow down the preset list.
- Main area — a card grid displaying all matching presets.
Clicking any preset card opens a detail panel on the right side showing full preset information.
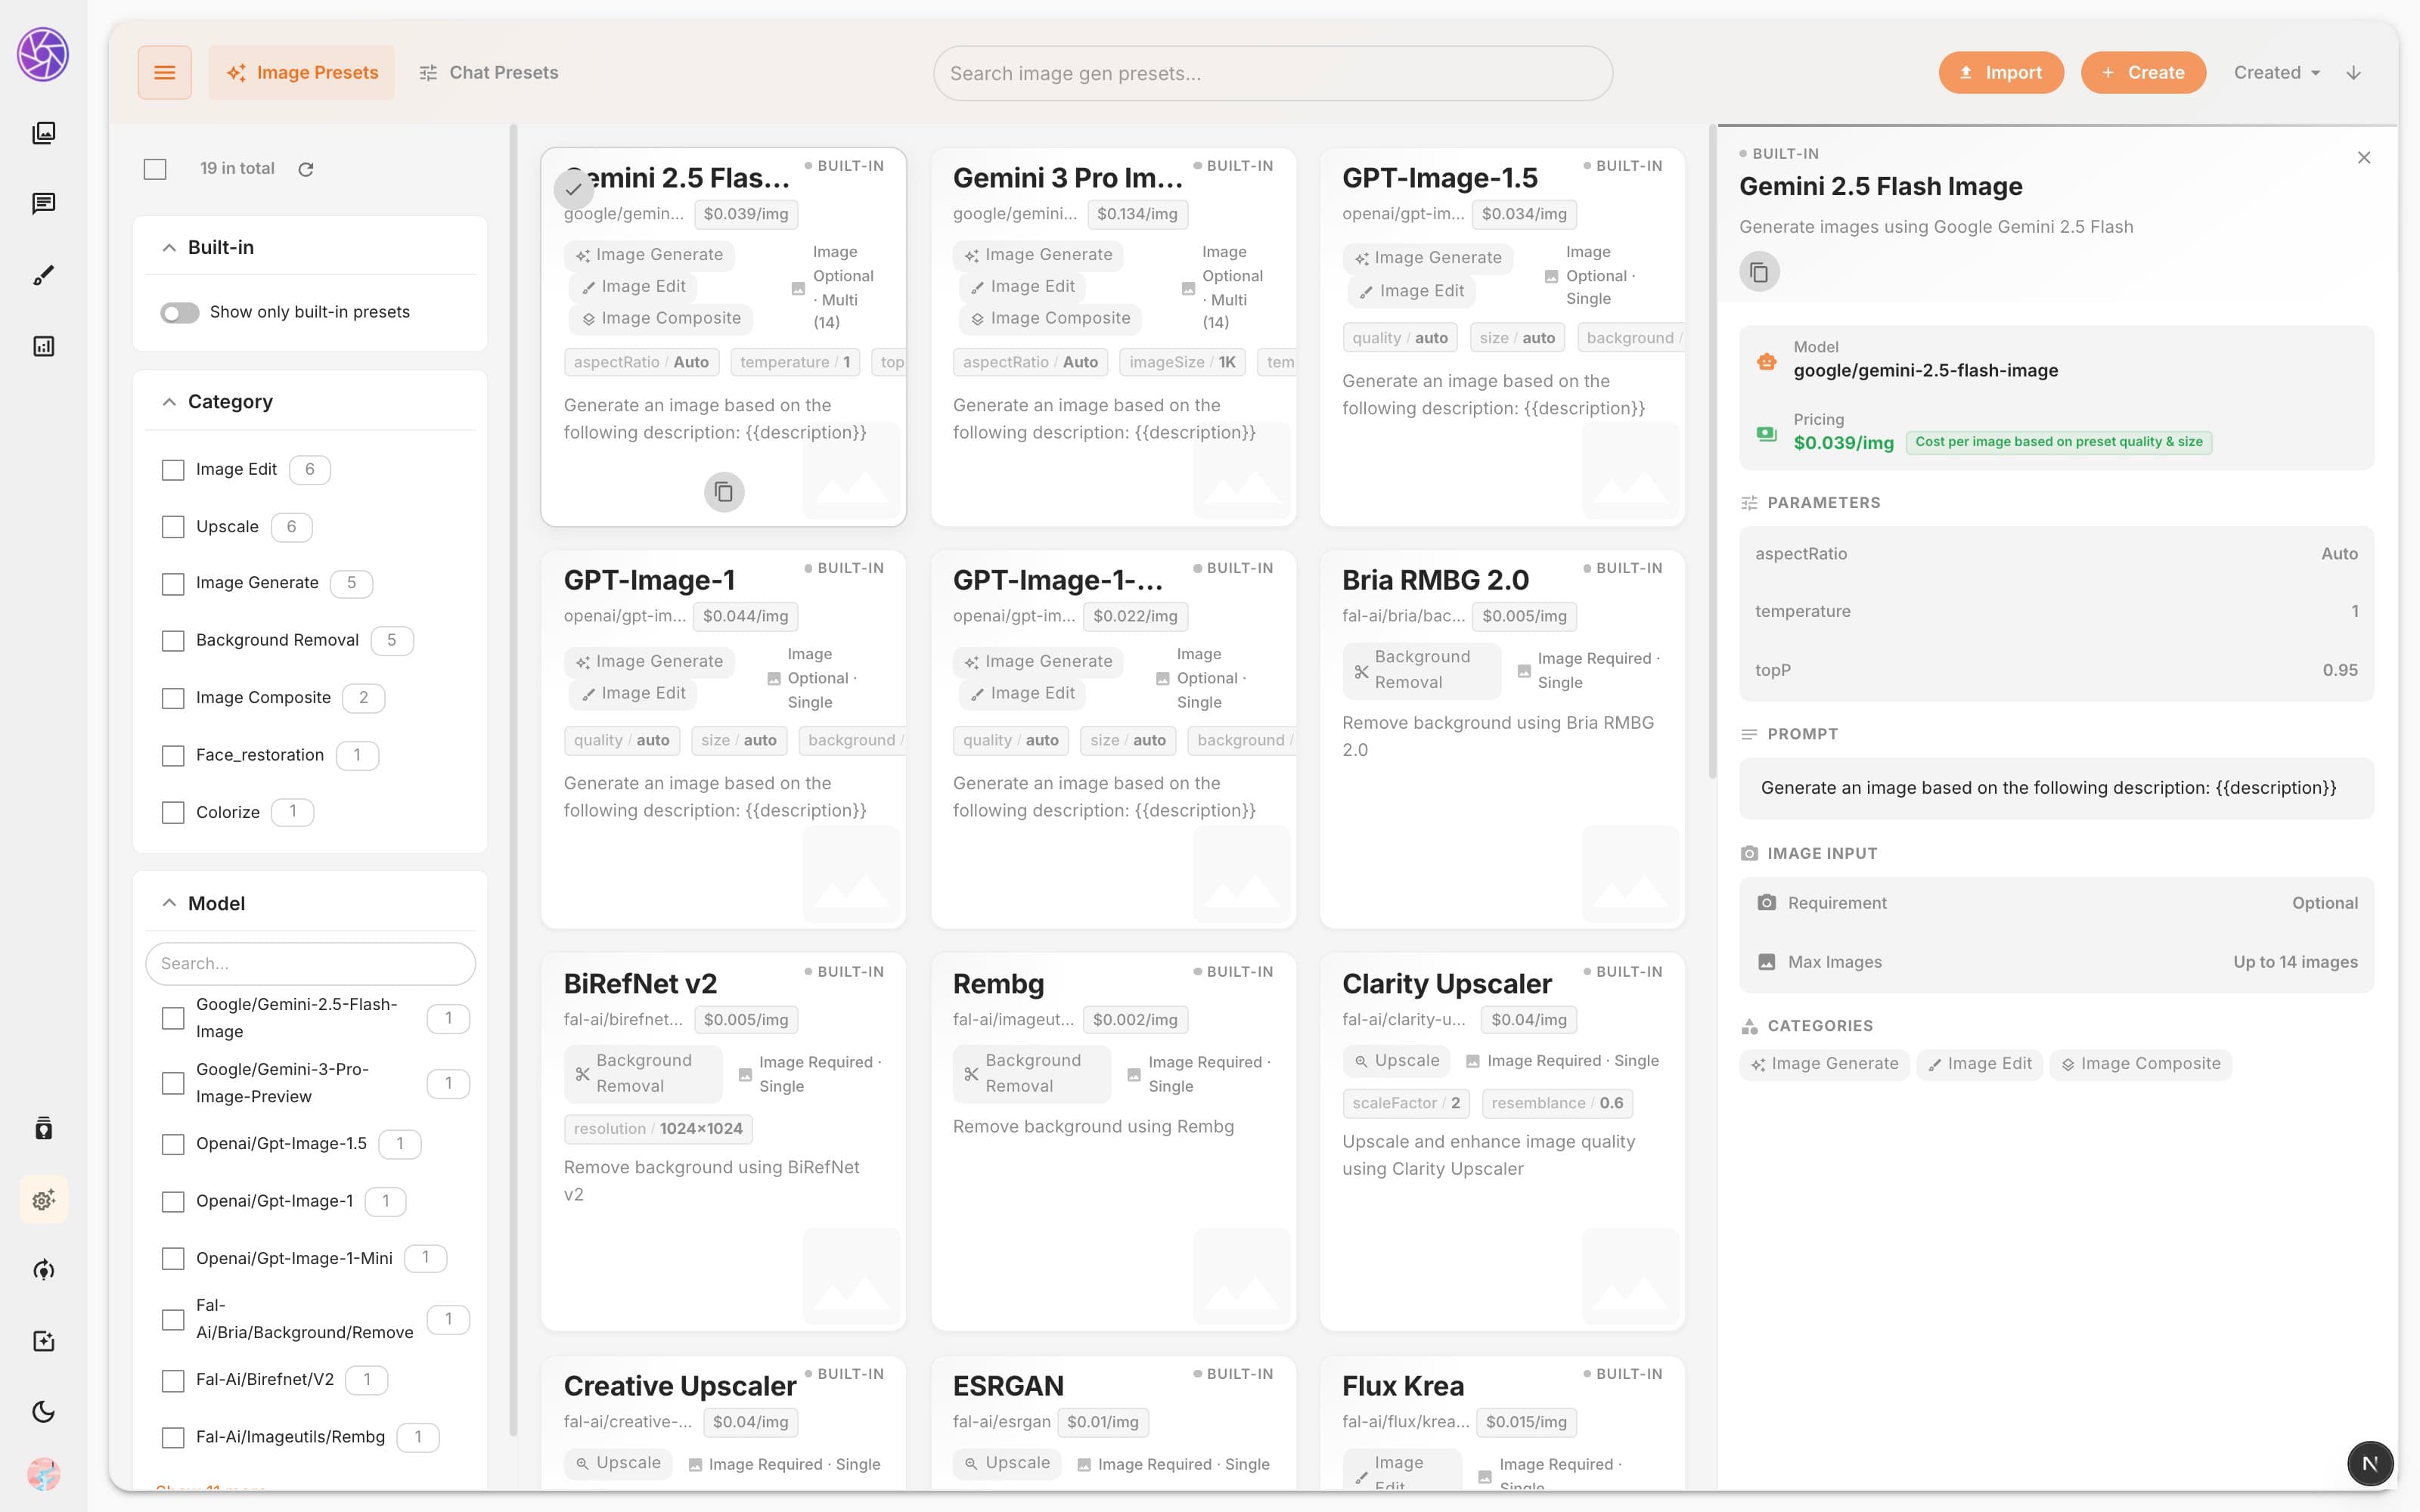
Browsing presets
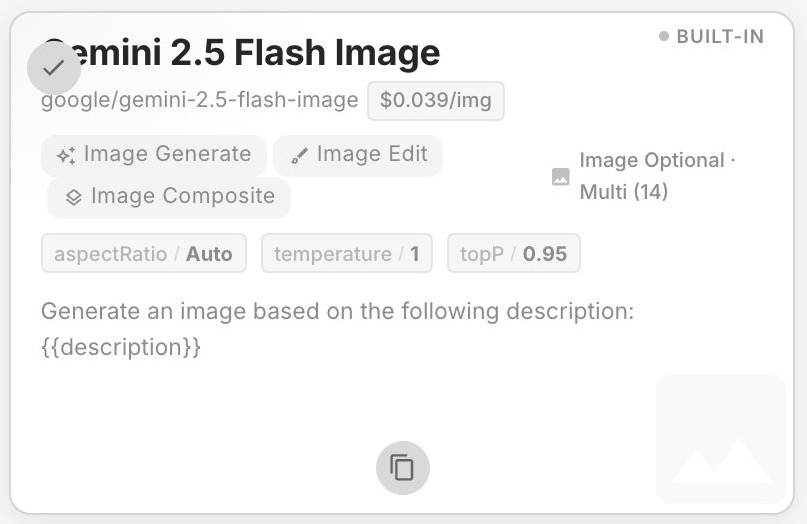
Preset cards
Each card shows a summary of the preset:
- Title and model name
- Pricing indicator — color-coded cost estimate (green = low, yellow = medium, red = high)
- Built-in badge — marks presets that ship with Media Moana (read-only)
- Categories — visual category labels
- Image input — whether the preset requires or optionally accepts input images
- Parameters — key/value chips showing model-specific settings (e.g. quality, size)
- Prompt preview — a fading preview of the prompt content
Hover over a card to reveal action buttons: Clone, Edit, and Delete (edit and delete are hidden for built-in presets).
Search and sort
Use the search box in the top bar to filter presets by title, model, or other text fields. Sort results by Title, Model, Created date, or Updated date using the sort dropdown.
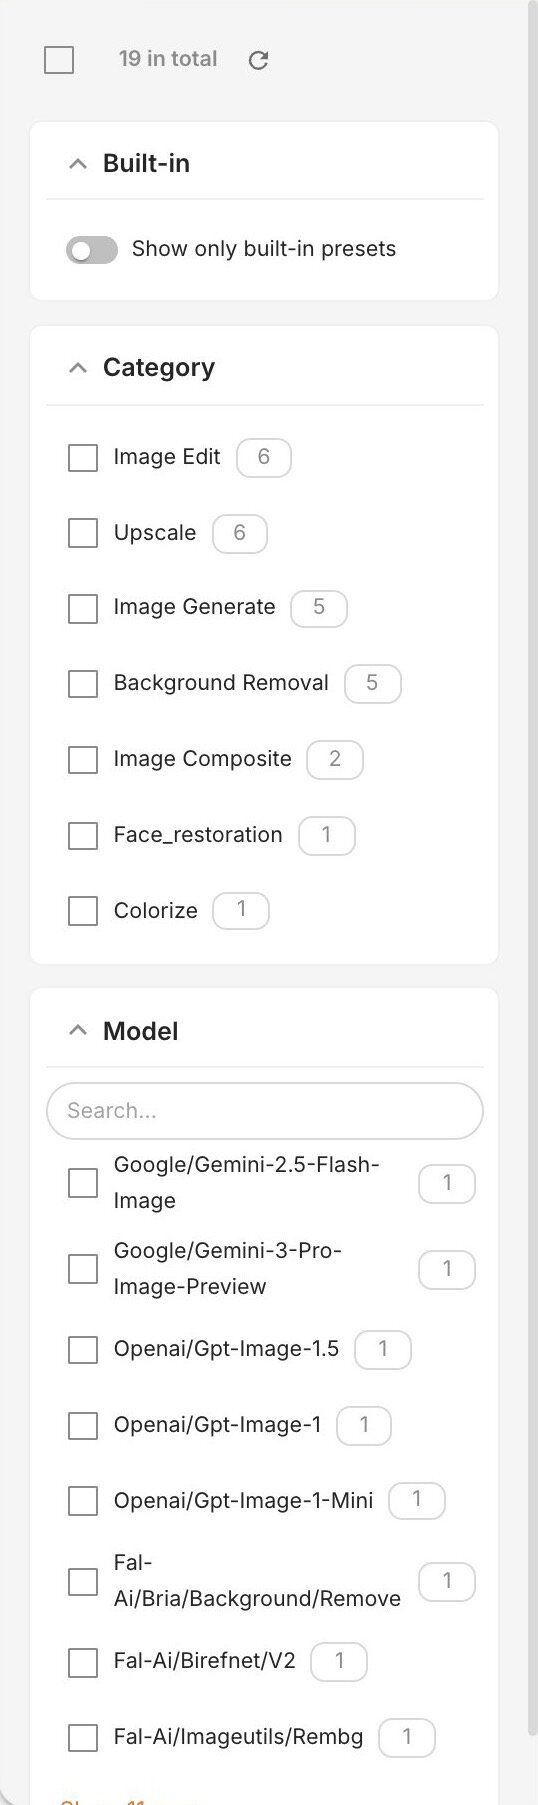
Filters sidebar
The left sidebar provides faceted filters to narrow down the list:
| Filter | What it does |
|---|---|
| Built-in | Toggle to show only built-in presets |
| Category | Multi-select filter by preset category |
| Tags | Multi-select filter by tags |
| Model | Multi-select filter by AI model |
Detail panel
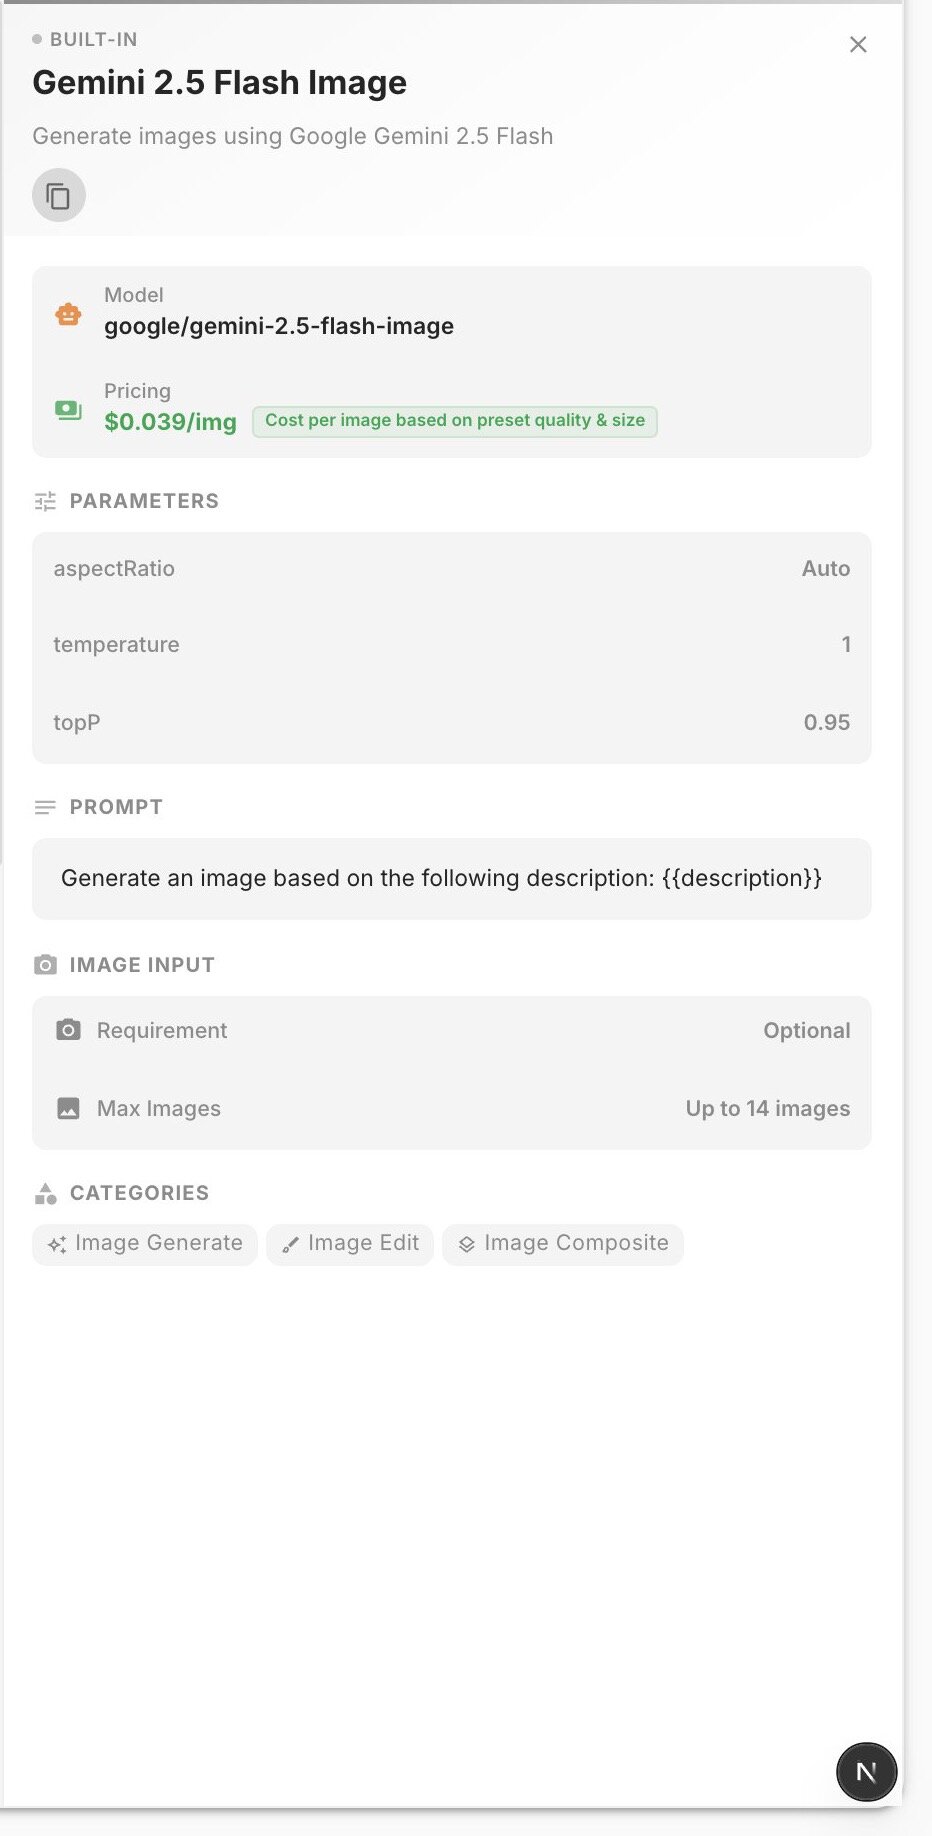
Click any preset card to open the detail panel on the right. It displays the full preset information:
- Header — title, description, and built-in badge
- Model — the AI model assigned to this preset
- Pricing — estimated cost per image or per million tokens
- Parameters — all model-specific parameters as key/value pairs
- Prompt — the full prompt content rendered as markdown
- Image Input — whether images are required or optional, and maximum number of input images
- Categories — category labels with visual indicators
- Schema — JSON Schema definition (chat presets only)
- Timestamps — created and last updated dates
Action buttons at the top of the panel let you Edit, Clone, or Delete the preset (edit and delete are unavailable for built-in presets).
Creating a preset
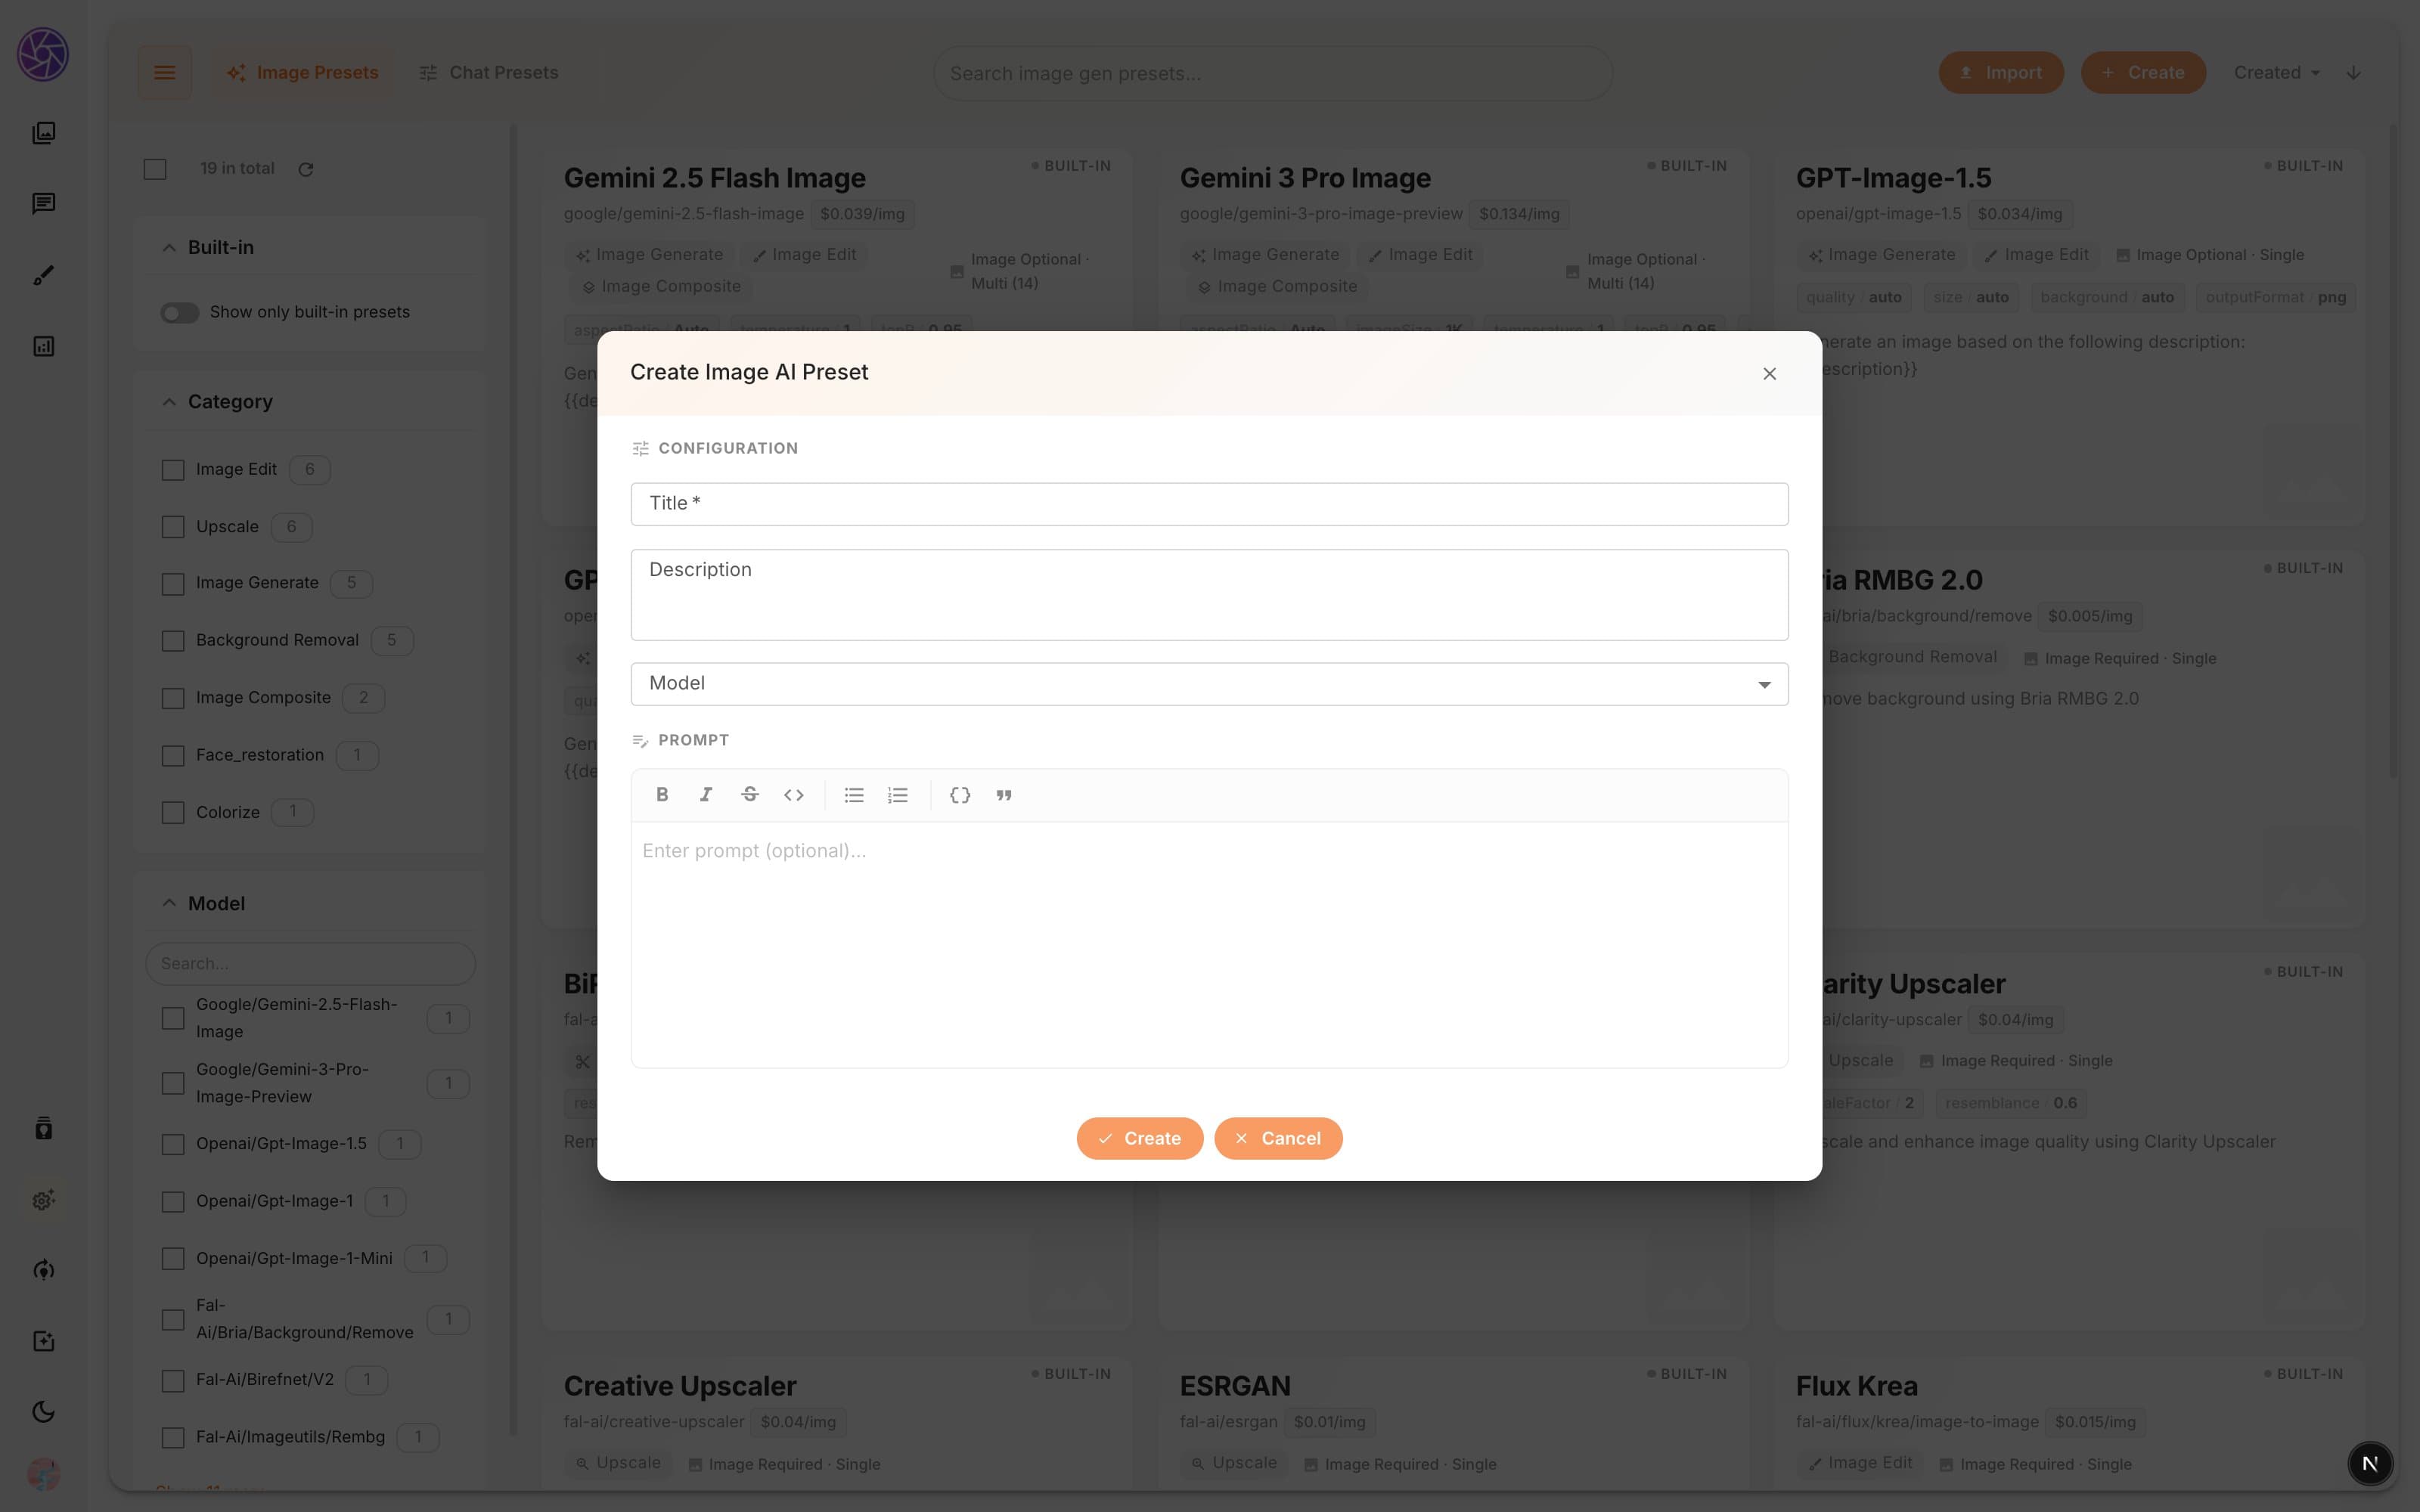
Click the Create button in the top bar to open the create dialog. The dialog has three sections:
Configuration
- Title (required) — a name for your preset
- Description — an optional description of what the preset does
- Model — select from your enabled AI models
For image generation presets, selecting a model reveals dynamic parameter fields specific to that model (e.g. quality level, output size, style). These parameters are saved with the preset and applied automatically when you use it.
Prompt
Enter your prompt content using the rich text editor. For image generation models that don't accept text input, this section shows a notice instead.
- For chat presets, the prompt is required
- For image presets, the prompt is optional (some models generate from parameters alone)
Schema (chat presets only)
Enable Structured Output (JSON Schema) to define a schema that the AI model should follow when generating responses. This is useful for getting consistent, machine-readable output.
Toggle the switch to reveal the schema editor where you can write or paste your JSON Schema. An info alert appears if the selected model may not support structured output.
Editing a preset
Click the Edit button on a preset card (on hover) or in the detail panel to open the edit dialog. The edit dialog is identical to the create dialog but pre-filled with the preset's current values.
Built-in presets cannot be edited — the edit button is hidden for these presets.
Cloning a preset
Click the Clone button to create a copy of any preset (including built-in ones). The clone is created immediately with the title "Copy of ..." and appears in your preset list as a custom preset that you can edit freely.
Deleting presets
Single delete
Click the Delete button on a preset card or in the detail panel. A confirmation dialog appears before the preset is permanently removed.
Batch delete
Select multiple presets using the checkbox that appears when hovering over cards, then use the Delete action in the selection toolbar. Built-in presets are automatically excluded from batch deletes.
Import and export
Import
Click the Import button in the top bar to upload a JSON file containing one or more presets. Each preset in the file must include at least a title field. Imported presets are added to your collection as custom presets.
Export
Select one or more presets using the card checkboxes, then click Export in the selection toolbar. The presets are downloaded as a JSON file with internal fields (id, userId, timestamps, builtIn) removed — making the file portable and ready to import into another Media Moana instance.
Built-in presets
Media Moana ships with a set of built-in presets that serve as starting points for common tasks. Built-in presets:
- Are marked with a Built-in badge
- Cannot be edited or deleted
- Can be cloned — clone a built-in preset to create a custom version you can modify
- Can be filtered using the "Show only built-in presets" toggle in the sidebar
Selection and batch operations
Hover over any card to reveal a select checkbox in the top-left corner. Select multiple presets to enable the selection toolbar with batch actions:
| Action | What it does |
|---|---|
| Export | Download selected presets as a JSON file |
| Delete | Delete all selected custom presets (built-in presets are skipped) |
The selection toolbar shows the count of selected items and provides a clear selection button.
Tips
- Clone built-in presets to create your own customized versions. This gives you a solid starting point without starting from scratch.
- Use categories and tags to organize your presets. The sidebar filters make it easy to find presets by category or tag later.
- Export before experimenting. If you plan to make significant changes to your presets, export them first as a backup.
- Use structured output schemas in chat presets when you need consistent, parseable responses — for example, extracting metadata or generating structured data.
- Check model compatibility when using schemas. Not all chat models support structured output — the dialog shows a warning if the selected model may not support it.
Last updated: July 7, 2026